Pages

Monday, July 25, 2011

Deflected Double Weave

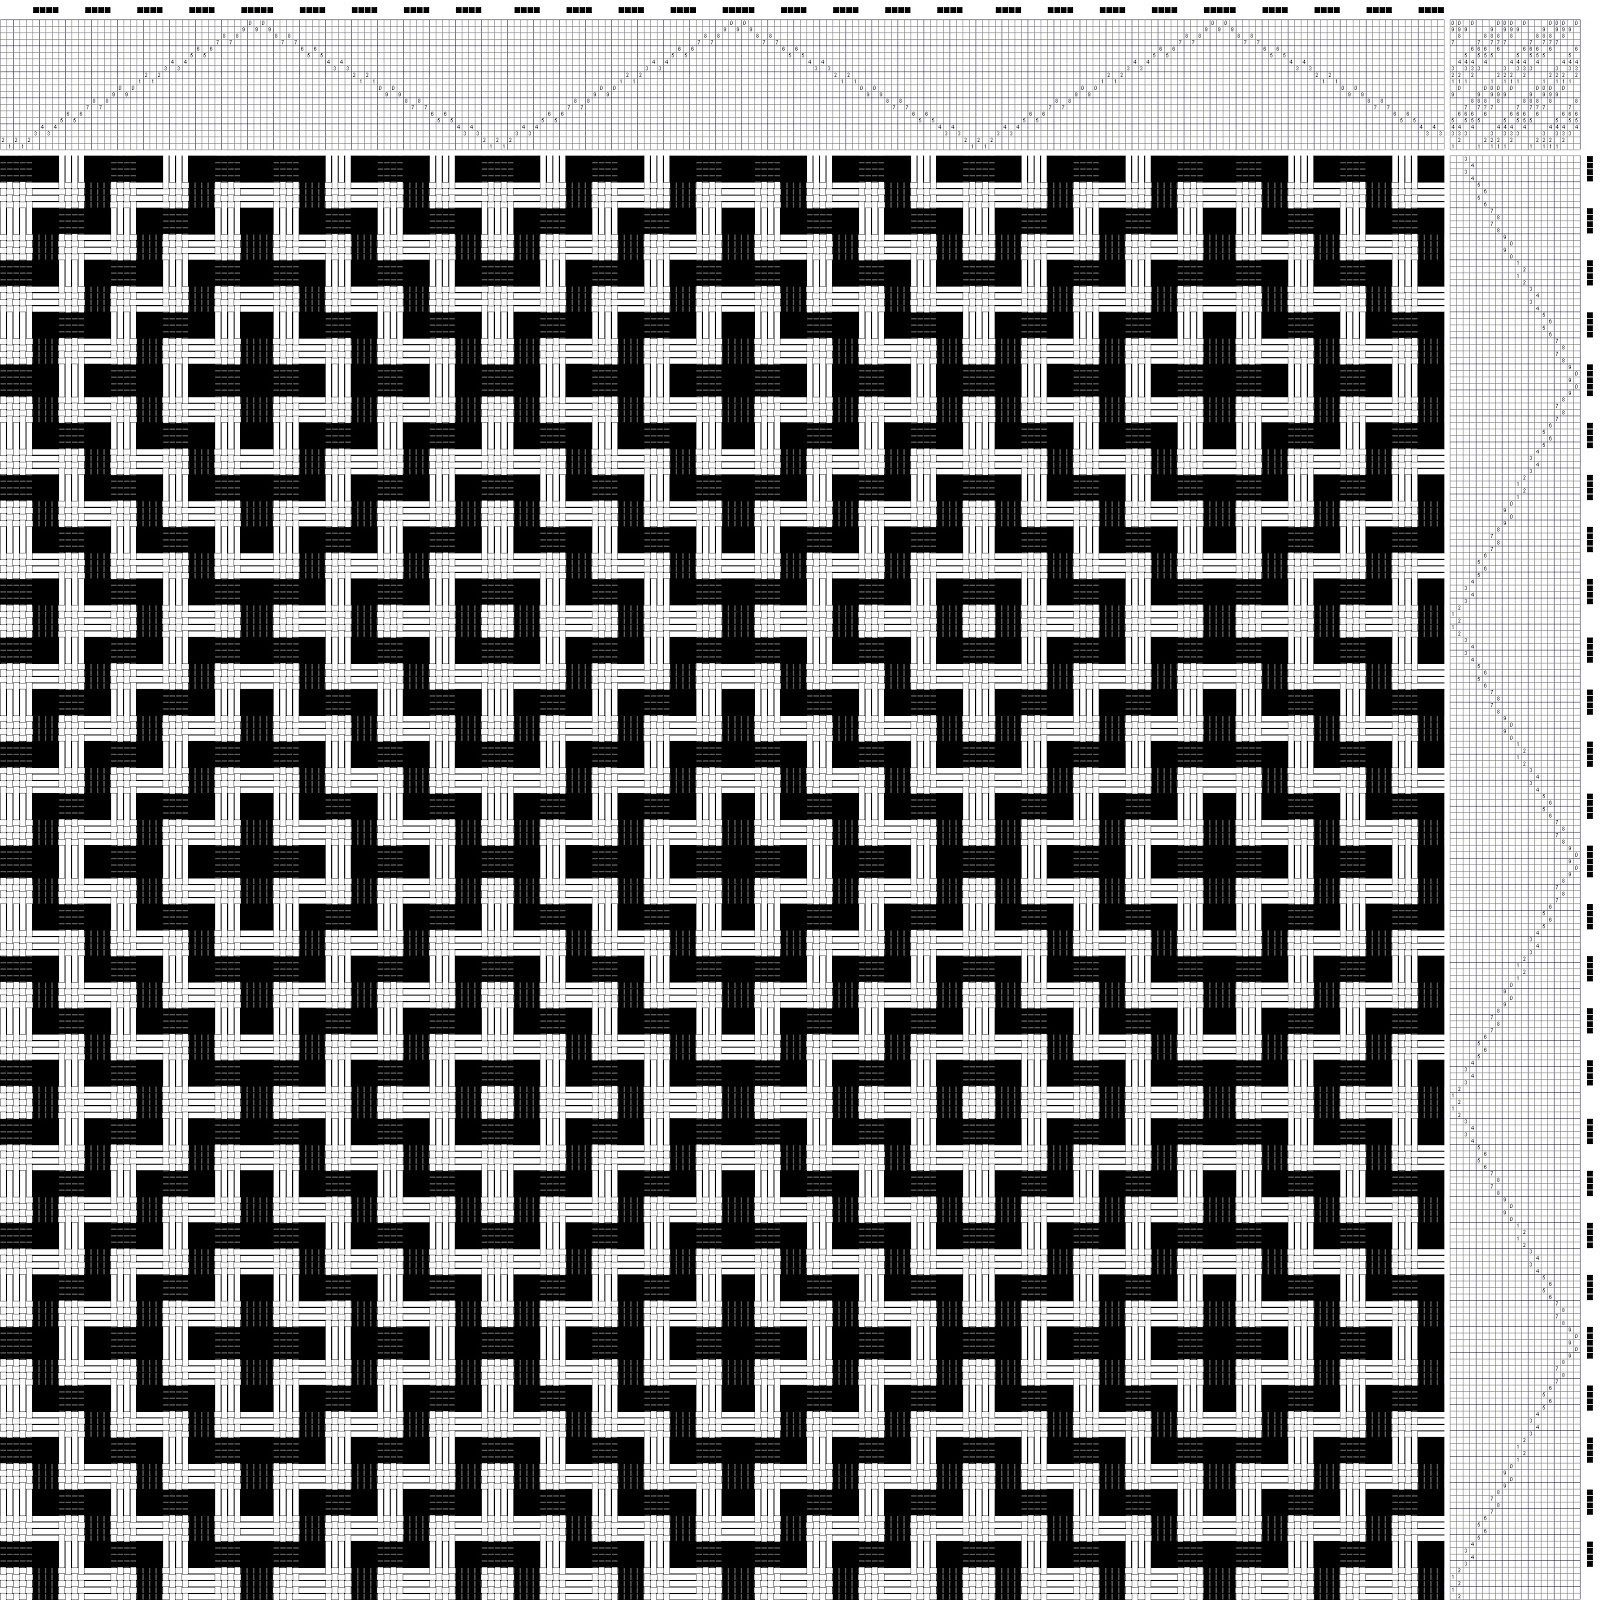
I was looking at some 18/2 Merino sitting on my shelf  and thought that it might be a good idea to do some Deflected Doubleweave. So I re-read the article "Deflected Doubleweave: beyond the basics" by  Madelyn van der Hoogt. I tried various profiles as suggested and then played with my weaving software (Pixeloom) to see if I could automate the creation of the full threading. I ended up with this method;


1. Draw a twill threading with alternate colors in the warp. This example is very simple just to illustrate the method.

2. Expand the threading by 2.

3 Use Block Substitution selecting"overshot".

4 Change number of treadles to 8.

4 Change the tie up to a deflected double weave tie up. I have started keeping all my tie-ups, threadings, treadlings and colour schemes  in a Library folder and then using the Import function to bring them into whichever draft I am working on.

5. Use "Tromp as Writ" function to redraw the treadling

6. Use "Use warp colours" function to make weft colours the same as the warp

I did this exercise starting with a various 10 shaft twills so I ended up with  several 20 shaft deflected double weave drafts. I came across a draft for 16 shaft deflected double weave in the Files section of WeaveTech  (DeflectedDoubleWeave.WIF  posted by R S Blau) which helped me understand the tie up variations that are possible. It was this draft that lead me to the "Ultimate" threading that I have referred to in previous blogs


3.

Sunday, July 24, 2011

Ultimate Threading 3

..and Turned Taquete and Echo

Ultimate Threading 2

In addition to my previous post the threading also supports Monks Belt and Shadow Weave

Saturday, July 23, 2011

Ultimate Threading

As always it will have been done before, but I have worked out that the threading in pictured below will enable me to weave loads of things without having to re thread for some considerable time


It is an overshot threading with 10 independent blocks on 20 shafts with 4 shafts reserved for the selvedge. The pictures below show what I believe I can weave on this  threading;

Lace
Twill - ADI
Twill -advancing point
Twill - curve
Overshot


Deflected  Doubleweave
I am sure that there is more than this but what I have here will keep me busy for months.

Friday, July 8, 2011

4 Colour Double Weave - first attempt

This blog has been left un updated for a long time – not good.

The two Brighton Honeycomb scarves that I wove on the Glimakra are now off the loom and in constant use. The use of a double weft thread for one of them was very effective.  I have put on an alpaca warp that is sitting on the back beam waiting to be threaded. This won’t happen until I have installed the Toika EW24W Control Unit that is on order for an August delivery. I combined the order with a friend who wanted  a controller plus a loom from Toika in an attempt to reduce the freight costs. It is a long way from Finland to Australia.

The warp from hell ( see post xxxx) has been woven as 4CDW. It was tentatively going to be a shawl but the cloth is too heavy and the pattern is too variable for it be anything but cushion covers or bags of various sorts. I was plagued with a sticky warp to start off with but once I got the weaving going I couldn’t stop. I will post some photos when I get home tonight.

Monday, April 18, 2011

Low Warp Tapestry Loom


In a previous post I said that I found it much easier to weave tapestry on a horizontal table loom rather than an upright tapestry frame. I had read previously about the two styles of French tapestry high warp (haute lisse, aka Gobelin) and low warp (basse lisse, aka Aubusson), knew what a Gobelin loom looked like and I had seen all the upright tapestry looms that are available on the market. What I had not come across was any information about low warp tapestry looms.

Searching the internet on "low warp" didn't give me much, but once I switched to using French weaving terms (basse lisse, metier a tisser, tapisserie and aubuson used in various combinations) it started getting interesting.  It took a while to get used to looking at French sites but what with recalling my schoolboy French and using Google Chrome as my search engine with its translation functions I soon able to get the hand of what I was looking at . I needed to exercise care with the automatic translations  as some of them, particularly of weaving terms, came out a bit wide of the mark. For example, fils de chaîne  (warp threads) is translated Google as "son of string".

To start with, an explanation of the difference between "Le metier de basse lisse" and "le metier de haute lisse" is here;  http://cmthibert.free.fr/cmpages/metiers.html.
I must stress that my research has been on the use of low warp looms for tapestry. The term “basse liise” when applied to looms in French also covers conventional cloth weaving handlooms.

The loom – metier a tisser de basse lisse
The montage of photos below gives a pretty good idea of what the looms look like:-


and here is a larger picture;


The construction is quite straight forward. The main differences between these looms and conventional horizontal looms are;
  • No beater
  • The warp runs directly from a beam at the back of the loom to a beam at the front of the loom.
  • The  back beam is mounted in an adjustable dolly or carriage  that allows additional control of the tension – over and above that put on by rotating the beams.
  • The back beam is higher than the front beam so that the warp slopes slightly upwards from front to back.
  • Warp threads are held in place on the front and back beams by a “verdillon” (I can’t find a translation). This is a metal rod that is held in place by hooks set into a groove that runs the length of the beam.
  • There are two sheds which are controlled by harnesses positioned below the warp. The connection between the warp and the two pedals is shown in the series of photographs on this page here - http://www.vive-la-creuse.com/ciao93/index.php?post/2008/02/26/La-Tapisserie-sur-Basse-Lisse-4-Montage-de-la-Chaine-fin. It took me a while to work out how this all fits together
  • There is a plank just behind the front beam that extends across the width of the loom.


.


Sunday, April 17, 2011

Getting ready to tie on

The two Brighton Honeycomb scarves are finished and safely wrapped round the cloth beam. I have but lease sticks in behind the heddles and cut of the warp where it is dangling ready to be tied onto the new warp. The new warp is beamed and ready to be tied onto the old warp. This is going to be fun!


For this scarf I m going to try Breaks & Recesses (Strickler #47).  I will be using chocolate alpaca for both the warp and the weft.


This will mean changing the tie up but it should be fairly straight forward the second time around. 


Sunday, April 10, 2011

Two yarns in the weft

Having finished the first Brighton Honeycomb scarf and for the second scarf I have been using a weft of two strands of 15/1 merino and so far it looks quite good. I have no idea how it will behave when I washed but I wove a 12" sample that I shall experiment with first.


I tried using a shuttle with two bobbins but got into an awful pickle with the selvedges so I fabricated a doubling stand from a milk crate and wove successfully with the two strands wound onto one bobbin.

Tuesday, April 5, 2011

Weaving on a Countermarch Loom

Last week I started weaving and it is all good.

My first threading is straight 8 with a Brighton Honeycomb tie up. I have woven this before so I know what to expect and can focus  on the touch sound and feel of the loom. The warp is two colours of Bendigo 2 ply (Pampas and Ginger) set at 18epi and for the weft I am using some nice 2/12nm chocolate (70% alpaca / 30% bluefaced leicester) yarn  that I bought in the UK a couple of years ago.


I did a bit of sampling first to get a colour combination that I liked and also to get used to the overhead beater. It was all over the shop to start of with but settled down after a while. I still have to squint down to check that I am getting the correct treadle but I am not having to adjust as much as I did when I started.

 The amount of effort that I have to expend  is minimal so I find that I am weaving for much longer at a stretch. The size of the loom suits me and I like the fact that I can see exactly what is going on. I get up every now and then, take a stroll round the loom, give it a pat and then it is back to the pilots chair and the loom and I sail  serenely on. A bit fanciful I know but the creak of the beam and the sounds of the treadles and the two capstan wheels on the side all  bring images of large sailing ships to mind.

Sunday, March 20, 2011

Countermarch

In January I bought a Glimakra 47" standard. I have been working my way through putting it together, tying it up, untying it up, buying the definitive book (Joanne Hall) and then tying it all up again correctly.  

 The warp that I put on is  two colours of Bendigo 2 ply (Pampas and Ginger) set at 18epi.
The knee beam makes a handy place to rest the reed when sleying

.


To my surprise I was able to get right into the loom (it was a bit of a squeeze) and after a while I was positively hopping in and out.  It is better than yoga!

Thursday, January 13, 2011

Dodgy drafting

My intention was to weave a stitched double weave shawl. The draft was based upon the work I did with stitched double weave to produce a wall hanging. I decided to take one motif (a diamond)  and use it to stitch together two loose plain weave layers. My yarn was bendigo 2 ply that normally sets at 14 epi for plain weave so I decided on 12 epi for each layer making an  overall sett 0f 24 epi. I carefully sampled this and was happy with the result.

Where I went wrong was when I amended the draft to 22shafts, with two left over for selvedges (which you don't need for plain weave!). For some reason that I can't now fathom I decided that a point threading was the way to go. I amended the draft and produced a new .wif and it all looked good. At the time I was very pleased with myself as i can see from what I wrote: - Bi colour warp on pointed threading

I put on the warp the loom, battled through the initial stickiness and with help worked out how to a use the sandpaper beam effectivly and started weaving. Disaster, unexpected floats appeared. Investigation showed that my design was flawed - you can't weave two layers of plain weave on a pointed draft. Once I realised the problem it seemed obvious. One layer of double weave is woven on the odd shafts, the other on the even shafts. With a pointed draft you are going to get two adjacent threads in a layer on the same shaft whenever the draft turns.


As I had spent a fair bit of time getting the warp on I was keen to use it for something so I decided to try a turned taquete draft. Again it looked OK on paper (or strictly speaking "on computer") but having woven about six inches, using 28/2 alpaca-silk as the weft, I don't think that is going to work. It looks insipid because the warp colours were selected for the double weave shawl and do not suit the new draft and as everyone says, you should use something shiny.

So, I am going to bite the bullet and re thread to a straight 24.  Several lessons learnt but this double weave shawl is going to be good when it is done!

Wednesday, January 12, 2011

Overshot Sampler

The overshot sampler was finished before Christmas.


 I tried as many yarns as I could for the pattern weft, some were good and some were shocking but I deem the project to be a success in that I now have definite ideas about the yarns I shall be using for my three planned overshot projects!


Upholstery - 16/2 cotton for warp and tabby, 11/2 wool (bendigo 2 ply) for patern weft.

Wall hanging - 16/2 coton for warp and tabby, DMC perle cotton #5 for pattern weft. I might well do the wall hanging in Monks Belt.

Scarf & Shawl - 28/2 alpacca-silk for warp, 28/2 merino for tabby ( or maybe 28/2 silk as well) and 18/2 Zephyr wool-silk for pattern weft


The actual projects will have to wait as I have just started a turned taquete shawl - more on this later.

Wednesday, December 15, 2010

Overshot sampling

I have had some overshot projects lurking in the back of my mind for some time now. It is over three years ago that we all first studied overshot in our weaving classes and I have decided to revisit this technique over the Christmas holidays.

I put a 3 yard wrap of 16/2 cotton set at 24epi onto my table loom and I have been weaving a series of little 6" to 8" samples varying the wefts and the beat.  So far for tabby I have used 16/2 cotton, 20/2 perle cotton, 28/2 silk/alpaca, 28/2 merino and 18/2 merino. For pattern weft I have tried perle cotton, 11/2 wool, 18/2 wool/silk, appletons crewel wool and 22/2 merino. I have a few more yarns to try and I want to see what some treadling variations look like.

This should be finished in a few days then I will cut them off, hem and wash them to see how they all turn out. I might tie on a short warp of 28/2 silk/alpaca to see how it goes. The objective of this exercise is to come up suitable yarn, treadling and beat combinations for a scarf, a wall hanging and some yardage for a skirt.

It is so nice to be doing straight forward weaving again!

Wednesday, November 24, 2010

Tapestry


At long last I have finished this tapestry. The most difficult part was deciding how I as going to treat the dangling ends. I tried several treatments but ended up with this one which is made of painted fishing weights. I shall call this work " Composition in cotton, wool, lead, acrylic and bamboo"! The bamboo bit is the hanging stick.

The tapestry workshop that I referred to in an earlier post has been and gone. The topic for our work was "The Owl and the Pussycat". This photos below shows how far I have got.


 I am finding the diagonal lines very tricky! I hope to find some time over the Christmas holidays to get it finished but in the meantime I have a threaded loom which is calling out to me to weave some stitched double eave and turned taquete.

Thursday, October 7, 2010

Tapestry on a horizontal loom

I have nearly completed the "Sun" tapestry but I have put it to one side whilst I worked on how I could improve the mechanics of what I was doing. I had found that after a while working at an upright frame became uncomfortable. Working on my lap solved this but in this position I found that I had difficulty in keeping the frame still whilst I opened a shed with my fingertips and controlling it whilst laying in the weft. Because I felt that the whole setup was unstable I was unable to focus on getting a consistency of texture across the piece. I had also being having problems with getting an even warp tension on the loom and keeping it nice and tight.

Pondering on all of this I remembered and re-read an article by called "Weaving a tapestry on a horizontal loom" by Jay Wilson in the May/June 1995 edition of Handwoven. What he had to say made eminent sense to me so I dug out a 2 shaft loom that I had sitting on a shelf  and put on a 2 yard warp of 12/9 seine twine.


I have started weaving on this warp and my main problems seem to be resolved;
  • No more tension problems. I laced on the warp at both ends and gradually increased the tension whilst "twanging" the warp to spread the tension. Using this table loom I can get the warp much tighter than I could on a frame and this helps with packing in the weft.
  • I find the working position very comfortable and I can see exactly what I am doing. 
  • Making the shed is easy and I no longer have to struggle

I have started using netting needles as well as bobbins and I find the needles easier to use in certain circumstances.

I have been working on a piece using slits and wrapping technique and trying (not always successfully) to get even selvedges and uniform coverage. Three strands of Appleton's crewel wool seems to be doing the trick for the weft. Early days but I am much more comfortable about it all.

Sunday, September 26, 2010

Tapestry Diversion

A tapestry workshop is coming up and I have booked for it. The workshop is being run by Marie & Yvonne. I have been to a couple of their workshops and they were both very good. (They do other things, see http://ymmyarns.blogspot.com/)

 To quote from the notice for the workshop "More experienced make tapestries using supplementary weft or work on your own design while learning more advanced techniques."

The problem is that apart from a two day tapestry workshop where I wove a little sampler that is languishing in a drawer somewhere and a play with a very 70s style wall hanging about six months ago my tapestry experience is non existent. So, I have until the 21st October to become "more experienced"!

I took the warped frame from the wall hanging, shifted it around until I had "empty" warp and off I went.


It became a sort of extended doodle that I have been working on all last week. I tried various yarns that I had and found that Paternayan Persian seemed to suit me best. There is a tapestry shop about ten minutes walk from my work (Morris & Sons) so I have been able to pop in during my lunch break to get fresh supplies.

I didn't have a cartoon (apart from one for my attempt at a circle) but I did sketch what I had done with loads of notes. There is a load of work to do on my technique (tension and coverage) and until I started colouring my warps (red shed/blue shed) I had all sorts of problems.


 I still tend to get lost when building up shapes and then filling in their complement; I feel much more comfortable doing a row at a time but even then shapes tend to wander off an do their own thing. Great fun but I think that this piece of work has run its course so I shall do another couple of inches (columns or pillars I think to get this weft interlock thing nutted out) and the I shall start a fresh piece of work.

Friday, September 17, 2010

How to make a sticky warp

Sleying went very well and took no time at all. I used a small comb to straighten and sequence the threads before pulling them through the reed. I also used the comb when getting ready to lace on to make sure that all the threads in each bout (20 threads, 1" each each), were in place and tight before tying the final knot. Lacing on also went very well.

I spent a bit of time putting on my automatic tensioning system. I have advanced from house bricks suspended from an old shower curtain rail to proper weight lifter weights. It took a bit of time to get the tension right and I have made a mental note to go for the box of rocks solution next time  (as shown here).

Disaster struck when I started lifting shafts to start checking my threading - the plastic comb had induced so much static electricity in the warp that it was impossible to achieve any working shed separation.


I did some research (Handloom Weaving Technology - Allen A. Fannin and Weave-tech archives) and as a result of this I have applied children's untangle hairspray, put in some round lease sticks and shortened the distance between the back beam and the castle. After a couple of days rest the warp seems to have settled down and I shall have another go at getting the weaving started this weekend.

Tuesday, September 7, 2010

Threading is finished

Hurrah! Now for the sleying.

Saturday, August 28, 2010

Still threading

I am now halfway through threading the warp for the Big Block Blue Blanket. I think that the seond half is going to progress much faster beause of two changes I have made.

My life (ie Weaving)/ work balance was all wrong. I had got into the habit of getting to work just after 7:30AM with the idea of getting away smartish to do some weaving in the early evening. I didn't work as I frequently didn't get away on time and was often too tired to do any weaving when I got home. I now get up at the same time and get in at least of hour of weaving before I leave for work. Now it doesn't matter what time I leave work in the evening or how tired I might be as I have already done some weaving work.


The other things I have done is change the way I hold the threads in place just before threading them. Rather than having them held in place by a snitch knot to a piece of cord attached to the breast beam I now spread them out in a small open topped reed (from my warping wheel) and hold them in place with a strip of velro. Having the threads in order right in front of the heddles means that I am not straining to pick up the correct thread from the cross on the lease sticks which is behind the heddles. I am sure that this is being done by loads of other people but I am quite pleased with myself for stumbling upon it. My shoulders and neck are thanking me for it.
Posted by Picasa

Sunday, August 15, 2010

Threading position

I am finding the threading on the AVL much trickier than on the Nilart.

Try as I may I cannot get myself into position where I can see the lease sticks and heddle being threaded all at the same time, unless I m sitting so low that I can't operate the treadles. I need to use these so I can lift the shaft that is to be threaded. This means that there is a bit of craning and squinting, particularly when putting the thread on the hook. I messed around with mirrors and I even tried using a web cam mounted behind the loom but to no avail. However it was  OK as long as I g0t up and stretched every five minutes or so.

I have just read  what Laura Fry has to say on the matter (Threading Motion) and I see that the threads that are next to be threaded are taped to the bottom of the back shafts. The answer for me must be either to follow this method using Velcro to preserve the cross or to substantially lower the lease sticks. I shall experiment tomorrow!

Thursday, August 12, 2010

Keeping the cross safe

Over the weekend I took the dust sheet of my AVL Workshop Dobby Loom and did the upgrade to the ratchets and pawls on the cloth and breast beam. The original ones were plastic and just not up to the job of maintaining any decent sort of tension. I must have bought my loom just before they corrected this design flaw, so I had to buy an upgrade kit. The templates that came with the upgrade kit were as not as accurate as they might have been, or I am cack handed, as I had to re-drill one of the holes for the pawl. All done now but one has to ask what sort of testing they did with the original design.

I have put on a 21" wide warp for a stitched double weave shawl. I use an AVL warping wheel with a cross maker attachment (didn't come as standard; should it have done?). In the past I have tied the crosses before winding the warp on to the beam. This time I tried using a stationery ring to secure the cross and it worked a treat. When the warp was safely on the beam it was a simple matter to replace the ring with the lease cords, which were tucked up between to rakes when I was doing the actual winding.
Ring
Ring on the cross
In position on the beam
Warp being wound on

Lease cords threaded
Ring removed

Lease cords secured to a couple of rakes