We have been away for a couple of days trying out camping and getting ready for a bush walk Back to my weaving today, another scarf finished and on to the next one. I am beginning to get to the stage where I want this warp finished so that I can move onto the next project. I feel a bit guilty about this the warp has served me so well and taught me so much!
Saturday, March 16, 2013


Sunday, March 10, 2013
Double Weave Lace
In that brilliant book Doubleweave : On Four to Eight Shafts by Ursina Arn-Grischottthere there is a picture of a beautiful double weave shawl with what seems to be two layers of airy lace held together by almost invisible stitcher threads. My next project is to work towards weaving a similar type of shawl. There are going to be several stages to this, the first being to determine a weave structure. I shall start with double weave huck and weave a sample using something nice and visible like an 8/2 cotton. This will enable me to see how the different layers sit together and where to put the stitchers - these are the places where the two layers intersect to join them together.
As always when thinking about double weave I have to go back to first principals otherwise I get confused as to what is happening. The Complete Book of Drafting for Handweavers, Madelyn van der Hoogt explains very nicely the ins and outs of huck lace and there is loads of material on doubleweave by Paul O'Connor on http://handweaving.net.
The pictures below show how I have derived the doubleweave draft. The first draft shows the basic 4 shaft huck lifts; this is the draft for my blue top layer. The second is exactly the same but with the threading moved to shafts 5 to 8 and a similar movement on the treadles; this is the draft for the pink bottom layer. The third draft shows the two interleaved together and the lifting of the top layer out of the way when weaving the bottom layer.

Now as the draft stands both layers will be the same; plain weave top/plain weave bottom, huck lace top/huck lace bottom and so on. The draft shown below has been modified to allow for different structures in the layers, in this case huck lace on the top with plain weave on the bottom.
One of the problems I have with double weave drafts is that I find it is difficult to see the structure from the draw-down. It is possible to see the warp and weft floats in the draft below but not easy. I use PixeLoom for all my drafting but WeavePoint, which I use to drive the control unit on my loom, has a cunning feature that recognizes double weave in the View/Fabric function. So I derive the drafts in PixeLoom and view the fabric in WeavePoint. The screen grabs from WeavePoint of the blue and pink layers (top and bottom) are shown in the picture next to the draft.

The next think to do is to work out where to put the stitchers as there is nothing joining these two layers of cloth. There will be a bit of theory needed that I shall address tomorrow (I love theory but I know that it is not everyone's cup of tea) but their ultimate position will be decided when I weave the sample.
In the meantime I am still weaving my scarves and they are looking pretty good. I have put up an inordinate number of pictures of these scarves, so no more now until they are being modeled!
As always when thinking about double weave I have to go back to first principals otherwise I get confused as to what is happening. The Complete Book of Drafting for Handweavers, Madelyn van der Hoogt explains very nicely the ins and outs of huck lace and there is loads of material on doubleweave by Paul O'Connor on http://handweaving.net.
The pictures below show how I have derived the doubleweave draft. The first draft shows the basic 4 shaft huck lifts; this is the draft for my blue top layer. The second is exactly the same but with the threading moved to shafts 5 to 8 and a similar movement on the treadles; this is the draft for the pink bottom layer. The third draft shows the two interleaved together and the lifting of the top layer out of the way when weaving the bottom layer.

Now as the draft stands both layers will be the same; plain weave top/plain weave bottom, huck lace top/huck lace bottom and so on. The draft shown below has been modified to allow for different structures in the layers, in this case huck lace on the top with plain weave on the bottom.
One of the problems I have with double weave drafts is that I find it is difficult to see the structure from the draw-down. It is possible to see the warp and weft floats in the draft below but not easy. I use PixeLoom for all my drafting but WeavePoint, which I use to drive the control unit on my loom, has a cunning feature that recognizes double weave in the View/Fabric function. So I derive the drafts in PixeLoom and view the fabric in WeavePoint. The screen grabs from WeavePoint of the blue and pink layers (top and bottom) are shown in the picture next to the draft.

In the meantime I am still weaving my scarves and they are looking pretty good. I have put up an inordinate number of pictures of these scarves, so no more now until they are being modeled!
Friday, March 8, 2013
Keep it tidy
In my last few posts I have written about the fun that I have been having weaving a series of scarves with occasional diversions into technical stuff. I have also been doing a bit of planning for my next project (double weave lace).
Somehow during all this activity I managed to completely wreck my weaving area so there has been no weaving today and a big tidy up. My wife was less than complimentary about the difference I had made but I think that it is all a bit tidier. The top two pictures are "before", the bottom two are "after".

Considering the size of our house I am very fortunate in the amount of space that I have for my looms, equipment and supplies. I just put it down to a lack of charity on my part that I find the picture on the front cover of this excellent book intensely irritating.

Somehow during all this activity I managed to completely wreck my weaving area so there has been no weaving today and a big tidy up. My wife was less than complimentary about the difference I had made but I think that it is all a bit tidier. The top two pictures are "before", the bottom two are "after".

Considering the size of our house I am very fortunate in the amount of space that I have for my looms, equipment and supplies. I just put it down to a lack of charity on my part that I find the picture on the front cover of this excellent book intensely irritating.

Thursday, March 7, 2013
Back of the loom
I rewove the last 6 inches of the scarf and all is good.
I decided to critically reappraise my arrangements at the back of the loom. Have a look at the photos below - it is all a bit industrial and just asking to get itself into a pickle. The selvedges warps are on netting shuttles and at great risk of getting tangled with each other and the live tension system. The netting shuttles sometimes unravel and the weights fall off and they tend to get caught in sectional warp beam.
 One of the blessings of traditional European style loom is that there is always somewhere to hang things from. So instead of letting my weighted selvedges hang from the back beam I have raised them up. I have used two broomsticks and the pictures show how the new disposition looks. I have replaced the netting shuttles with tapestry bobbins and I can see them from my weaving position. I am of an age where dealing with things above waist height in infinitely preferable to messing around below knee level so that is another plus for this arrangement.

This is all fine and dandy (as my sister would say) but ultimately I am going to have to move to dedicated selvedge rollers. I have done a bit of a web search and I have found information from AVL, Luther Hooper and Bill Koepp. I need to find a wood turner - wooden cotton reels have disappeared of the face of the earth.

I decided to critically reappraise my arrangements at the back of the loom. Have a look at the photos below - it is all a bit industrial and just asking to get itself into a pickle. The selvedges warps are on netting shuttles and at great risk of getting tangled with each other and the live tension system. The netting shuttles sometimes unravel and the weights fall off and they tend to get caught in sectional warp beam.
 One of the blessings of traditional European style loom is that there is always somewhere to hang things from. So instead of letting my weighted selvedges hang from the back beam I have raised them up. I have used two broomsticks and the pictures show how the new disposition looks. I have replaced the netting shuttles with tapestry bobbins and I can see them from my weaving position. I am of an age where dealing with things above waist height in infinitely preferable to messing around below knee level so that is another plus for this arrangement.
This is all fine and dandy (as my sister would say) but ultimately I am going to have to move to dedicated selvedge rollers. I have done a bit of a web search and I have found information from AVL, Luther Hooper and Bill Koepp. I need to find a wood turner - wooden cotton reels have disappeared of the face of the earth.

Wednesday, March 6, 2013
Pipped at the post!
I started and finished a scarf today which is a first. Using an office chair rather than a stool made a difference and I think that the fishing line in the selvedge may have enabled to throw my shuttle with a little more gusto than usual. It was all looking pretty good as the top two photographs show.
Unfortunately I got over excited as the finishing line drew near and didn't notice that the selvedge threads on the left were inexorably tightening - the results can be seen in the bottom two photographs. No great disaster as I can easily re-weave these last few inches. The cause of the tightening was two of the selvedge threads becoming "pilled" together and catching on the lease sticks. A silly mistake because I am supposed to check for exactly this sort of thing when I put in a new pirn.

Unfortunately I got over excited as the finishing line drew near and didn't notice that the selvedge threads on the left were inexorably tightening - the results can be seen in the bottom two photographs. No great disaster as I can easily re-weave these last few inches. The cause of the tightening was two of the selvedge threads becoming "pilled" together and catching on the lease sticks. A silly mistake because I am supposed to check for exactly this sort of thing when I put in a new pirn.

Monday, March 4, 2013
Fishing Line in the Selvedges
There have been several informative posts on WeaveTech about reinforcing the selvedges with fishing line which is removed when the weaving is completed. I rather liked this one;

I am trying out using an office chair (adjustable) rather than a weaving bench. It is definitely more comfortable when working for any length of time. I have tended to keep stuff on the bench beside me so I had to commandeer the clothes peg basket as an alternative. It works a treat and now that I have bought a replacement for the clothes pegs I am no longer in trouble. In the photo you will see that next to the basket is my "grabber". There is nothing worse than getting settled and then having to get up to retrieve something that has been dropped under the loom.

I have been told that my selvedges are amazing. I always use a floatingI have done this but using the fishing line to augment the existing outermost selvedge thread on each side rather than adding a floating selvedge. I had to cobble together something to tie the line on to and came up with a bit of wire cut from a clothes hanger. I had to fiddle about a bit with the weights and the warp tension on the end feed shuttle but once that was done I got nice even selvedges on each side and a greatly reduced draw in.
selvedge of the same fiber in the body for consistent shrinkage etc. also, I
was told, by another weaver in my group who does beautiful work that she
adds to that selvedge following the same track and dent, as the floating
selvedge fiber, no heddle, is 12 lb test clear fish line weighted separately
from the main warp and not wound with the warp. Then when you are done
weaving and taking the piece off the loom, pull out the fish line. It pulls
out easily and the other selvedge thread maintains your edge perfectly. This
fish line helps support and defend your edge while weaving and gives it
strength and preventing some draw in. I love it.

I am trying out using an office chair (adjustable) rather than a weaving bench. It is definitely more comfortable when working for any length of time. I have tended to keep stuff on the bench beside me so I had to commandeer the clothes peg basket as an alternative. It works a treat and now that I have bought a replacement for the clothes pegs I am no longer in trouble. In the photo you will see that next to the basket is my "grabber". There is nothing worse than getting settled and then having to get up to retrieve something that has been dropped under the loom.

Saturday, March 2, 2013
Weaving Timings & Checks
I have finished the scarf that was started yesterday - much quicker that I thought. I took some notes of times spent and picks woven.
My basic unit of weaving is a pirn. I am using an AVL end feed shuttle and the pirn is about 5" long. I am getting about 140 picks per pirn which is around 9" of weaving. I takes me just under 20 minutes to weave off a pirn. It takes me just over 10 minutes to to be ready to start weaving again. During this time I do the following;
My basic unit of weaving is a pirn. I am using an AVL end feed shuttle and the pirn is about 5" long. I am getting about 140 picks per pirn which is around 9" of weaving. I takes me just under 20 minutes to weave off a pirn. It takes me just over 10 minutes to to be ready to start weaving again. During this time I do the following;
- Have a stretch
- Wind a new pirn
- Unwind more yarn for the selvedges (they are weighted separetely and hanging from the back of the loom
- Check that the live tension system is OK (sometimes the cords get twisted)
- Check that the warp is moving freely over the lease sticks
- Have some water
- Change music (if necessary)
- Have another stretch
- Feather in the new weft thread
So with the weaving time and the change over/checking time I am getting around 18" of weaving an hour. In theory this means that I could weave a scarf in four hours but I think that six hours would be more realistic; I find that I need to take a longer break every 90 minutes - a good turn round the garden and a cup of tea sets me up nicely for the next session.
Friday, March 1, 2013
Change of plans and distractions
I have been a little bit distracted over the last few days because I stumbled on a loom in a second hand shop that called to me! I walked away from it initially but in the end I just had to buy it even though I have no need whatsoever for another loom. It is a traditional 4 shaft counter balance of unknown provenance but with the dignity that comes from age and experience. It is now safely wrapped up in my shed waiting for me to do a bit of reorganisation to find a space for it.
In my last post I confidently stated that I would be weaving a rosepath patterned scarf using a "Ginger" weft. Well I won't! I wove a little bit and it looked shocking. It was both insipid and messy; because of the variety there is in the warp the rosepath pattern was lost. It looked marginally better in blue and in yellow but was still a bit ratty. I also wove a bit of 1/3 and 3/1 twill - the Ginger yarn is going back on the shelf!

So, no more rosepath - it is a striped warp so I focussed on a pattern that would emphasise this. I have settled on a weave called Tricot which comes originally from A Handbook of Weaves by G.H. Oelsner ( I got it from A Weaver's Book of 8-Shaft Pattens by Carol Strickler.)
The picture below shows the theory;

and this is what it really looks like;

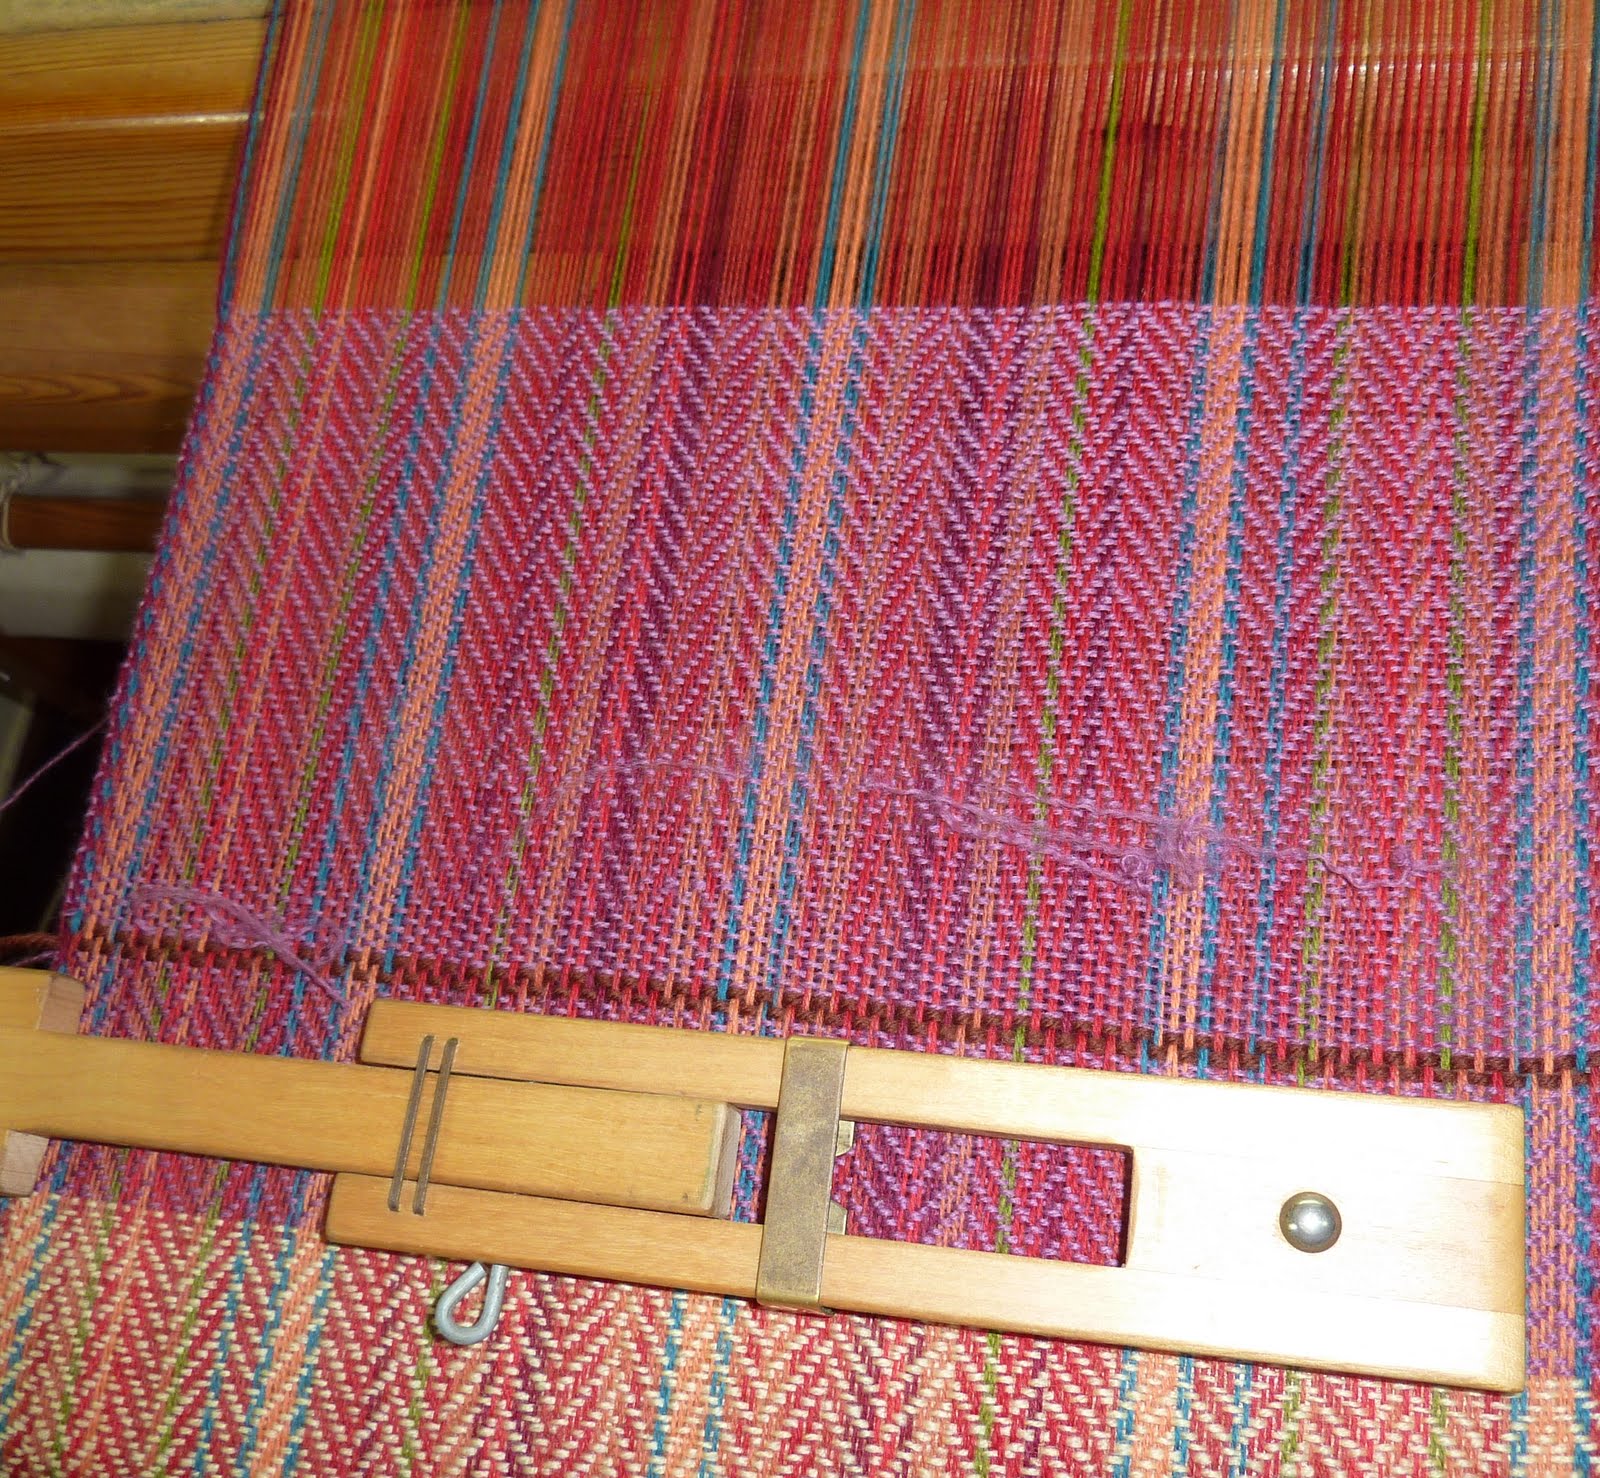
There is a very pronounced rib which looks good and the scarf is much brighter in the daylight than depicted in the photographs. I wove about 35" today so I should get it finished over the weekend.
In my last post I confidently stated that I would be weaving a rosepath patterned scarf using a "Ginger" weft. Well I won't! I wove a little bit and it looked shocking. It was both insipid and messy; because of the variety there is in the warp the rosepath pattern was lost. It looked marginally better in blue and in yellow but was still a bit ratty. I also wove a bit of 1/3 and 3/1 twill - the Ginger yarn is going back on the shelf!
So, no more rosepath - it is a striped warp so I focussed on a pattern that would emphasise this. I have settled on a weave called Tricot which comes originally from A Handbook of Weaves by G.H. Oelsner ( I got it from A Weaver's Book of 8-Shaft Pattens by Carol Strickler.)
The picture below shows the theory;
and this is what it really looks like;
Saturday, February 23, 2013
Rosepath Scarf
The scarf with the "Soft Plum" weft is finished and I am just starting on the second scarf which will have "Ginger" as the shade of its weft and a rosepath design in both the threading and the treadling.
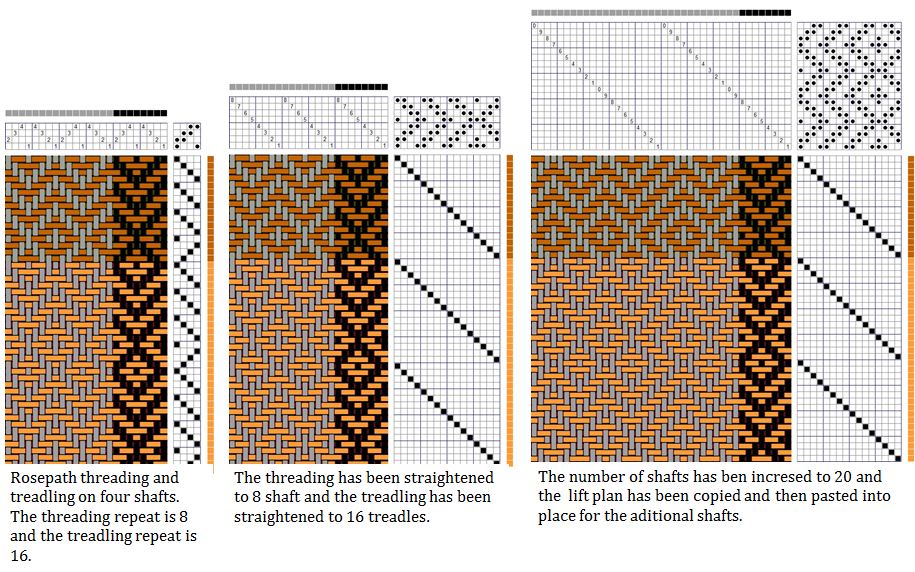
Again it is basically a four shaft draft expanded to fit 20 shafts and 16 treadles with extra shafts and treadles for basket weave hems and selvedges.


Again it is basically a four shaft draft expanded to fit 20 shafts and 16 treadles with extra shafts and treadles for basket weave hems and selvedges.

Monday, February 18, 2013
Basket Weave selvedges on 4 shafts
In my last post "We are off" I was talking about a herringbone scarf that I am weaving on a 24 shaft draft. I am using this threading because that is what was on the loom and tied on the new warp. This is the draft;

The weaving software that I use is PixeLoom which has an "Optimise Draft". When applied to the draft I get this;

When I consider how I derived the tie up for the 20 shaft (discounting the selvedges) draft I shouldn't have been surprised. The tie-up is Four Thread Herringbone
(Marguerite P.D. p 25) with the threading straightened to 8 shafts and
this was then used to create a 20 shaft tie-up. Optimising the draft restores the original herringbone threading.

Basket Weave & Herringbone - MPD page 49

As long as the tie up is for a 2/2 twill and the treadling is straight this will work for any 4 shaft threading; just thread up a bit of basket weave on each side, using odd shafts on one side and even on the other.
Wednesday, February 13, 2013
We are off!
Having tied on a new warp (see previous post) I was expecting to have to re-tension it. On spec I put in a couple of picks of tissue paper and to my surprise (and delight) I found that the tension was OK. I sampled several weft colours and battled with a dodgy selvedge on the right hand side. I spent some time adjusting the tension of the warp, the different tensions of the selvedges (weighted separately) and the tension on the end-feed shuttle. I found that by having less weight on the right hand selvedge than the left hand one the problem was sorted.

I finally settled as "Soft Plum" for the weft colour of the first scarf.
The pattern is herringbone with basket weave selvedges (thank you Sandra Rude) and a bit of basket weave at the start and finish. The draft below is what I am weaving because of the threading that I have tied on to but in fact this could be woven on four shafts!

I finally settled as "Soft Plum" for the weft colour of the first scarf.
The pattern is herringbone with basket weave selvedges (thank you Sandra Rude) and a bit of basket weave at the start and finish. The draft below is what I am weaving because of the threading that I have tied on to but in fact this could be woven on four shafts!
Sunday, February 10, 2013
Tying on a new warp
I have tied my new warp onto the warp that I left on the loom from the previous project. The last time that I did this I tied on in front of the heddles (http://gangewifre.blogspot.com.au/2010/05/tying-on-new-warp.html). This time I followed the excellent instructions to be found on Peggy Osterkamp's Weaving Blog (http://peggyosterkamp.com/100-great-weaving-tips/)

The only deviation from the script is the lilac yoga brick with a knitting needle stuck in the side and held steady by a small weight. I used this to help me position and tension each knot. I formed the knot around the needle and then slipped it off.
The only deviation from the script is the lilac yoga brick with a knitting needle stuck in the side and held steady by a small weight. I used this to help me position and tension each knot. I formed the knot around the needle and then slipped it off.
- Top Left shows the set up. There are two broom sticks running from the back beam to the front beam with a plank resting on the top. My plank is a bit rough so I have put a tea towel on top. The new warp comes up over the back beam, through its lease sticks and over the plank. Each one inch bout is held taut by a small weight which dangles own from the front edge of the plank (not visible). The old black warp emerges from behind the heddles, goes through its lease sticks and rests on the plank.
- Top Right shows the two warps approaching each other through their respective sets of lease sticks and held firmly in place by a small weight attached via a snitch knot. This is the the action area where the two warps are tied together with a square knot.
- Bottom Left shows the new warp at the back beam.
- Bottom Right shows the area where the two warps have been tied together The knots have been advanced through the heddles and reed to just behind the front beam.
I would say I spent as long as I would have done threading the warp but I took my time and checked everything very carefully. It took me a while to work out the optimal positioning for the two warps and how to secure the ends in place before tying them together. I also took a lot of photos for a record for next time. Towards the end I really speeded up and I am sure that this it will prove to be a real time saver the next time I do it.
This is the second time hat I haveI
This is the second time hat I haveI
Thursday, February 7, 2013
Winding a multi-coloured warp
I have just finished winding an 18 yard warp for a series of twill scarves. The colour scheme is based upon the front cover of "The Handweaver's Pattern Directory" which I first tried to analyse about three years ago. It isn't an exact match as I am using my existing stocks of Bendigo 2ply. Once I have used this I can't repeat it because Bendigo Woolen Mills have severely reduced their colour range in 2 ply, which is a great pity.

I used my AVL warping wheel, sometimes it is a pity to take the warp of the wheel - the stripes of colour look so good!

Because there were frequent colour changes I put together a spreadsheet which gave me a precise guide as to when to change colour and when a section ends. The raw data came from the .wif file of the draft to which I applied some formulae and conditional formatting.

Friday, February 1, 2013
Warp & Weft faced Lampas - part 3
The Warp & Weft Faced Lampas is finished and off the loom. The cloth is much better for coming off the loom and being washed; it looked decidedly ropey when on the loom. I am happy with the result and would probably want to use this structure for furnishing fabric.
 I had great fun with the fabric at the bottom right where I used discontinuous wefts which were interlocked under the warp floats. It took a bit of fiddling to get it right - you must be true to your shed!
A first for me was that I used a sewing machine to hem the samples. My wife gave me a quick tutorial and then I was off! Now that I have this knowledge the next time that I weave a sample I shall make it large enough to be turned into a bag or something else useful.
I also wove a "tapestry" on the same warp. Over Christmas I was separated from my looms so I did a small needlepoint to the same design. I have an idea that I might be reusing these colours in some other work.

A first for me was that I used a sewing machine to hem the samples. My wife gave me a quick tutorial and then I was off! Now that I have this knowledge the next time that I weave a sample I shall make it large enough to be turned into a bag or something else useful.
I also wove a "tapestry" on the same warp. Over Christmas I was separated from my looms so I did a small needlepoint to the same design. I have an idea that I might be reusing these colours in some other work.
Wednesday, December 19, 2012


Tuesday, December 18, 2012


Saturday, December 15, 2012
Twill Blocks
 I finished this scarf a couple of months ago, just in time for the summer so apart from posing in the garden it has not been worn yet.
 It is quite effective but I could have done better with contrasting the darks and lights in the colours.

PS: I have just checked; it was August when I started this and October when I finished it (Practise and vibes). Not very good productivity but I had to address the garden!

Tuesday, August 21, 2012
Museum in Bhuj
I would recommend that anyone fortunate enough to visit Bhuj in Gujarat, India should visit the Bhuj Museum; One of the exhibits that I liked was this one - it is worked in cross stitch and goes above a doorway. I have the name of these written down somewhere but it has gone missing!

From the photos that I took I have derived a needlepoint design which I have started on - I shall be at it for years! I took a few liberties with some of the colours When the sun is shining I take the frame into the garden, stitch away and listen to the birds (and occasionally the neighbour's lawn mower)


From the photos that I took I have derived a needlepoint design which I have started on - I shall be at it for years! I took a few liberties with some of the colours When the sun is shining I take the frame into the garden, stitch away and listen to the birds (and occasionally the neighbour's lawn mower)


Practise and the vibes
 There has been a very interesting debate on WeaveTech on tensioning and advancing a warp on a Glimakra standard. I played around with putting some live weight tension on the cloth beam but it didn't do much for me so I took it off. Because the cloth beam is so low I had to involve a pulley and it all became to complicated to adjust - besides which I think that AVL have already done it!
I have reduced the weight on the back beam and use a bit of piping to fit over the spokes of the cloth beam ratchet wheel so that I can advance the warp without herniating myself. I am much happier with the weaving - there is nothing that a good robust bit of washing and spinning won't resolve.
The scarf that I am weaving at the moment is on the same warp that was causing me grief (http://gangewifre.blogspot.com.au/2012/06/twill-streaks.html). After trying some technical solutions I have concluded that the deciding factor is practise - obvious really!
I suppose I would call it block twill stripes. I am trying to reduce my stocks of odds and ends of Bendigo 2 ply. I like the design; let's see how it executes!
I usually use end feed shuttles but on this scarf I am using boat shuttles because I don't have enough pirns for all the different colours. I am having a few problems with the selvedges as one of the pictures below shows. Little loops can be worked back into the scarf once it is off the loom but the occasional excessive draw in is a little bit more difficult to hide. As I progress I am getting better at controlling the tension of the warp using my finger on the spool. The truth of the matter is that because I am an occasional weaver I should allow for much longer samples on the warp so that I can weave myself back into the swing of it all.
I have decided to let all the warp ends at change of colour hang out and I'll thread then back in when the scarf is off the loom. I am doing this so as to get as few interruptions as possible to the actual weaving - it's the vibes man!

Saturday, July 14, 2012
Mandvi, Gujarat - Household Textiles
 In early April we found ourselves in Mandvi. We hadn't planned to visit but it kept on coming up in conversation with local people as a good place to go to. We were quite pleased with ourselves as we got there from Bhuj on a local bus which we organised by ourselves without the help of friendly staff from wherever we were staying, which was how we had been organising our transport up until then. All the signs at the bus station were in Gujarati script and we couldn't find any English speakers - Virginia got it all sorted and put us on the right bus.
 Mandvi is a delightful place and as it is not on the main tourist route there was no hassle. As with virtually everywhere we visited in India everyone was kind, courteous and helpful. The town had everything that we could want- beaches, bazaars, medieval gates and walls, lovely food, a palace, shipbuilding (magnificent - I will have to intrude it into this weaving blog), tie dying and weaving.
We stayed at the excellent Rukmavati Guest House. It was quite hot so we usually spent the afternoons there having a nap, chatting or reading. I found some of the household textiles quite interesting. I had my pick glass with me so I spent a couple of happy hot afternoons looking at them in detail. I had bought myself a book of graph paper in Bhuj so I was able to attempt to record my interpretations of these fabrics. Our host was a bit concerned at first as I rifled through his linen cupboard until I explained what I was doing. I think that he thought that I might be mad!
Cotton Blanket
This was not a particularly remarkable piece but I was very taken with the subtle shift in the weft colours. My photographs does not do it justice - something similar in mercerized cotton might be most effective. I ended up wearing it at times.

Cotton Hand Towel
The analysis of this was quite tricky because the threads kept shifting as I tried to determine which one was going over and which one was going under. The colours had faded so much that it was difficult to work out the sequence so the one shown below is part guess work as the pink and white were virtually indistinguishable.

 Cushion
This pattern was lurking under a synthetic cover that had been put on the cushion. It was torn and I spied the pattern through the hole. For some reason that I can't fathom I didn't take a photo of it.


All of these drafts can be done on a straight 24. I have never woven anything substantial in cotton so perhaps this can be my next project after I done enough wool scarves to keep family members happy.
Friday, July 13, 2012
Delhi - Design Ideas for Transparancies
We were in Delhi for four days right in early March right at the start of our trip to India. We stuck to the tourist straight and narrow, visiting the Red Fort, the Jama Masjid mosque, India Gate and the government buildings around the Rashtrapati Bhavan. I found the Red Fort rather melancholy probably because I knew that what we see today is just a shadow of its former glory but the Jama Masjid mosque was alive and vibrant with its purpose and the government buildings were interestingly quirky.
I wasn’t really expecting to see anything relating to textiles, but I soon became fascinated with the sheer volumes of colour that emanates from any group of Indian women. The amount of beautiful decorative details on the buildings, particularly the Red Fort, will provide me with plenty of ideas when I finally get round to doing some transparency weaving.
The pictures below show some of the lovely decorative detail on the buildings we saw and some of my preliminary work to convert then to cartoons


Subscribe to:
Posts (Atom)