Monday, February 24, 2014
Wednesday, February 19, 2014
Quills and Twisters
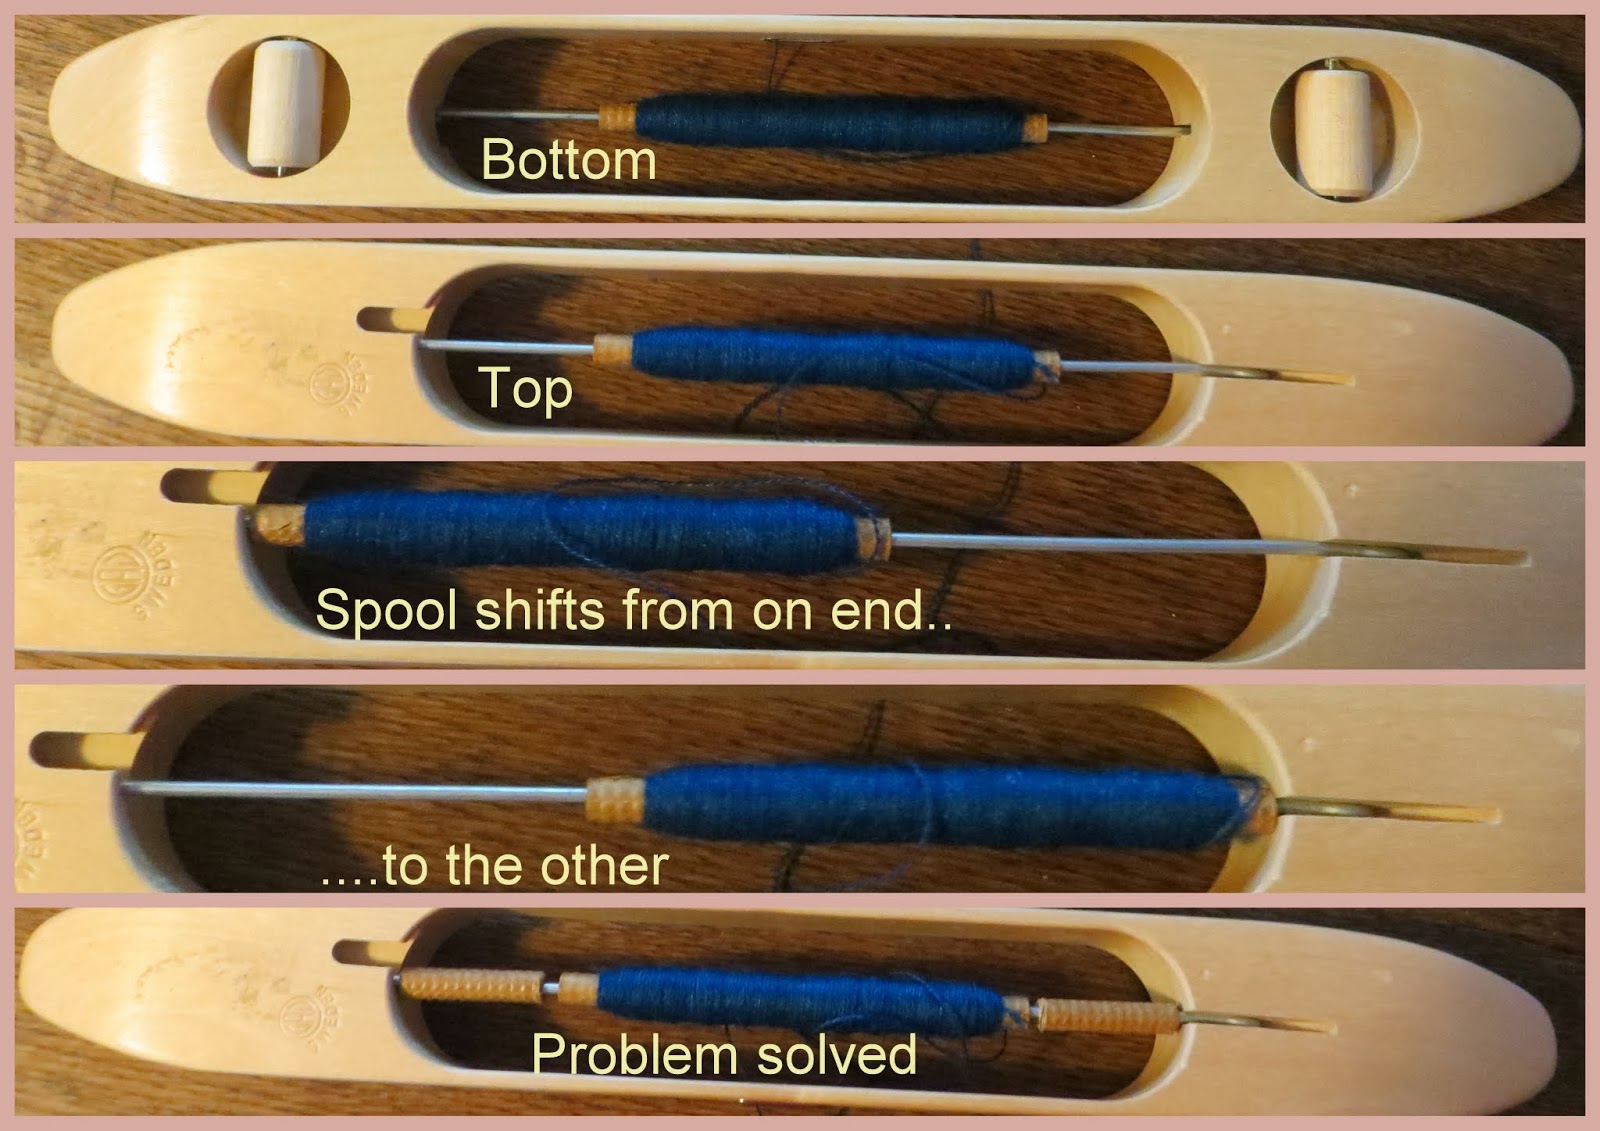
In a previous post I related how I was having problems with the spools in my new shuttle. I had some very pertinent and welcome comments from Maliz who gave me details and advice about the the benefits of winding a quill of the appropriate size. I have tried it and it works very nicely as the photos show.

I have finished the weaving the shawl and it is off the loom and it looks shocking which is what one would expect for something woven at half the plain weave epi/ppi.
I still have to full the scarf so I am afraid that I am going to miss my Friday birthday deadline. I hope that the recipient will understand!

I have finished the weaving the shawl and it is off the loom and it looks shocking which is what one would expect for something woven at half the plain weave epi/ppi.
I have started on the fringes which is fairly time consuming even with my twister. Thank goodness for audio books (Bleak House).
I still have to full the scarf so I am afraid that I am going to miss my Friday birthday deadline. I hope that the recipient will understand!
Sunday, February 16, 2014
Red dots on the beater bar
I have had a lovely day listening to music and weaving with the occasional foray into the garden between showers. If I focus tomorrow I may well get the weaving of this shawl finished.
I have put a couple of red dots on the beater bar. These are to guide my thumbs to the correct position so that I hold the beater in the middle. I noticed a tendency for slight slope in the last pick at the fell; one side was nearer to the previous pick than the other side. I put this down to either the fact that I wasn't aligning the temple parallel to the fell or that it was because of my habit of grasping the beater off centre - hence the red dots.
I am taking care with the temple and centering my hand on the beater and the problem has gone away. Successful problem resolution is always very satisfying.
I have put a couple of red dots on the beater bar. These are to guide my thumbs to the correct position so that I hold the beater in the middle. I noticed a tendency for slight slope in the last pick at the fell; one side was nearer to the previous pick than the other side. I put this down to either the fact that I wasn't aligning the temple parallel to the fell or that it was because of my habit of grasping the beater off centre - hence the red dots.
I am taking care with the temple and centering my hand on the beater and the problem has gone away. Successful problem resolution is always very satisfying.
Saturday, February 15, 2014
The picks are all right, but the selvedges; Oh my!
The warp is on for the DS Scarf #2 and I have started weaving the first sample which where I check that everything is in order, the tension is right, the warp advances smoothly, the threading and sleying is correct (alas, three cross overs) that the ppi is correct and the selvedges are behaving. After a while I got the beat where it should be (12ppi) but the selvedges were decidedly wonky.
I determined that the reason was that I was using a new shuttle. Normally when drawing a boat shuttle out of the shed I move it forward (to create the weft angle), stop the spool from letting out any more yarn by putting my thumb on it so that I am pulling the selvedge on the opposite side in just a little bit before I close the shed, release the tension on the weft and beat.
I have bought a new Glimakra shuttle, one with wheels. I wanted a shuttle that was light and well spread out so that it didn't go crashing through the floor of the shed. At only 6 ends per inch of 20/2 yarn the shed floor is not that robust. The shuttle trundles through the shed very nicely but because it is quite long the spool can shift from end to end which meant that I was missing the spool with my thumb and therefore not applying any tension to the selvedge. I have resolved the problem by cutting bits of another spool and using them as wide washers. Picture #4 above shows a marked improvement on the last dozen picks (though the beat looks to be a bit variable!
I shall weave another 9" of sample before I start to weave the scarf proper - that should be enough to get everything bedded in.
PS. It has just occurred to me that what I am calling spools should in fact be called quills - I shall have to check.
I determined that the reason was that I was using a new shuttle. Normally when drawing a boat shuttle out of the shed I move it forward (to create the weft angle), stop the spool from letting out any more yarn by putting my thumb on it so that I am pulling the selvedge on the opposite side in just a little bit before I close the shed, release the tension on the weft and beat.
I have bought a new Glimakra shuttle, one with wheels. I wanted a shuttle that was light and well spread out so that it didn't go crashing through the floor of the shed. At only 6 ends per inch of 20/2 yarn the shed floor is not that robust. The shuttle trundles through the shed very nicely but because it is quite long the spool can shift from end to end which meant that I was missing the spool with my thumb and therefore not applying any tension to the selvedge. I have resolved the problem by cutting bits of another spool and using them as wide washers. Picture #4 above shows a marked improvement on the last dozen picks (though the beat looks to be a bit variable!
I shall weave another 9" of sample before I start to weave the scarf proper - that should be enough to get everything bedded in.
PS. It has just occurred to me that what I am calling spools should in fact be called quills - I shall have to check.
Friday, February 14, 2014
Warping Mill
When I was on my recent workshop in Mittagong I used a warping mill for the first time. I liked it so I have just bought one. I find it very easy to use and I think that for shorter warps it is easier than using a warping wheel and sectional warping.
Normally when I am winding a warp with different yarns I wind the warp chains following the warp order as it is in the threading. So for this deferential shrinkage scarf (see previous post) previously I would have wound 30 ends of yarn A followed by 30 ends of yarn B, followed by 30 ends of yarn A and so on.
In this instance I wound all of yarn A on one chain and all of B on another. All went well and it was a speedy process. The pictures below show Yarn A spread in the raddle leaving spaces for yarn B.

I shan't be doing it again! The time saved in winding the warp was lost because I had to mess about with two rods attached to the back apron rod and two sets of lease sticks. Still, you have to try these things otherwise you could miss out on some cunning improvements!
Normally when I am winding a warp with different yarns I wind the warp chains following the warp order as it is in the threading. So for this deferential shrinkage scarf (see previous post) previously I would have wound 30 ends of yarn A followed by 30 ends of yarn B, followed by 30 ends of yarn A and so on.
In this instance I wound all of yarn A on one chain and all of B on another. All went well and it was a speedy process. The pictures below show Yarn A spread in the raddle leaving spaces for yarn B.

I shan't be doing it again! The time saved in winding the warp was lost because I had to mess about with two rods attached to the back apron rod and two sets of lease sticks. Still, you have to try these things otherwise you could miss out on some cunning improvements!
Wednesday, February 5, 2014
Yarn shopping
I have been yarn shopping.
The cones are of 20/2 NM Merino which hasn't been treated so it shrinks and felts very nicely as shown here and here. I bought it from Yarn Barn, West Coburg, Victoria.
I bought the skeins from Glenora Weaving and Wool which is based in Gerringong, New South Wales. I took a train down from Sydney so that I could have a browse before buying. I bought some more Mora 20/2, Alpaca Silk 28/2 and variegated 20/2 Silk. All are destined to be combined with the 20/2 Merino in various ways.
The first project will be a differential shrinkage shawl, similar to the scarf that I wove just before Christmas. I will be using analogous shades of blue. The blue 20/2 merino (almost a Royal Blue) is to be partnered with some 28/2 Alpaca Silk (Peacock). The colours are not quite as close together as the photo below would suggest. The peacock yarn is, well, peacock!
I have completed my project plan and shall start putting on the warp tomorrow. My deadline for this shawl is the 21st February - delivered!
The Monks Belt that I was working on is trimmed and washed. Here it is in a couple of cushion mock ups.
The cones are of 20/2 NM Merino which hasn't been treated so it shrinks and felts very nicely as shown here and here. I bought it from Yarn Barn, West Coburg, Victoria.
I bought the skeins from Glenora Weaving and Wool which is based in Gerringong, New South Wales. I took a train down from Sydney so that I could have a browse before buying. I bought some more Mora 20/2, Alpaca Silk 28/2 and variegated 20/2 Silk. All are destined to be combined with the 20/2 Merino in various ways.
The first project will be a differential shrinkage shawl, similar to the scarf that I wove just before Christmas. I will be using analogous shades of blue. The blue 20/2 merino (almost a Royal Blue) is to be partnered with some 28/2 Alpaca Silk (Peacock). The colours are not quite as close together as the photo below would suggest. The peacock yarn is, well, peacock!
I have completed my project plan and shall start putting on the warp tomorrow. My deadline for this shawl is the 21st February - delivered!
The Monks Belt that I was working on is trimmed and washed. Here it is in a couple of cushion mock ups.
Wednesday, January 29, 2014
Monk's Belt progress
I couldn't weave for a couple of days because of a ricked back. I am now back on track and should be finished tomorrow. It has been quite slow going with the frequent pattern weft changes and I am going to have do a little bit of work with a tapestry needle on the selvedges when the piece comes of he loom. I must finish it soon as I need the loom for some scarves that I am planning; more differential shrinkage
My wife has decided that it is worthy of becoming the front of a cushion cover - praise indeed!
Wednesday, January 22, 2014
Monk's Belt
I wove a Monk's Belt sampler in 2007 and it has been pinned to the back of a cupboard door ever since I wove it. I have admired it from time to time and vaguely thought about doing some more but nothing has ever eventuated.
In September last year a wove some Brighton Honeycomb scarves. The scarves were finished some time ago but I have yet to fringe, finish and photograph them in all their glory. They took second place to all the excitememnt of playing with my counterbalance loom and differential shrinkage. There was about two yards of warp left on the loom when I had finished weaving.
I have ordered some more 20/2 merino in several colours for my next foray into differential shrinkage and double weave. I have to get a birthday scarf finished and delivered by mid February so I hope that the yarn arrives soon.
In the meantime I am weaving some Monk's Belt on the warp left over from the Brighton Honeycomb. The weft is Bendigo 2 ply which I have re-sleyed to 15epi ( a tightish plain weave) and I am using the same yarn for tabby and doubled for the pattern weft. I am not sure to what the use the final product will be put; perhaps a table runner or a wall hanging for a gloomy corner.
I have had to rummage through my unused equipment box to find enough shuttles. The bottom shuttle in the picture below is my shuttle of choice, an AVL end feed but I have never used the top three before.
The pattern weft colours are those that I used for a multi-coloured warp early last year. I think that I have enough warp for three 24" hangings. This first one is fairly conventional; I might break out a bit for the next two.
Thursday, January 16, 2014
Double Weave with Differential Shrinkage
At the Contemporary Doubleweave Workshop I decide that I wanted to try some form of combination of double weave and differential shrinkage. Our tutor Liz sketched out a design for me (see the squared paper below) and I worked it into a draft and plan for a sample.
I started weaving it at the workshop but with the distractions of the interesting things that everyone else was doing I didn't get it finished until I got home
This is what the sample looked like when I took it of the loom
and this is what it looked like when I had finished it.
This piece will probably end up as a gift for a small niece. I need to think about the colours but I have enough now to enable me to work on a full size version with four panels. I am delighted with the results and I don't think that I would have got anywhere near weaving something like this if it hadn't been for the workshop.
Tuesday, January 14, 2014
Contemporary Doubleweave Workshop
Well that workshop was fun and very informative. I have learnt a lot from both our tutor and from my fellow students. Now it is just a case of putting it into practise. I will not be giving any hostages to fortune by listing what I have learnt; I shall talk about each topic when I have actually done it.
The pictures show some of the work that was done ( I shall be plagarising) and the spacious weaving rooms where we produced it. I wonder what the topic will be for next year's workshop.
Monday, January 6, 2014
Weaving Workshop - Contemporary Double Weave
It is just before 7:00 am on Monday morning and I am in Mittagong. I am just about to start week long workshop, "Contemporary Double Weave: reuse, layers and containers with Liz Williamson" which is being held at the Sturt Craft Centre and I have to confess to being a little bit excited.
My wife drove me down here last night (about 100k from Sydney) and I am staying in a student hall - very novel! The grounds of the Sturt Craft Centre are lovely, the buildings are set in very satisfying gardens with lots of arbors, pergolas and woodland walks.
Wednesday, January 1, 2014
Weaving Focus
One of the problems I have when I am weaving is that my mind tends to wander off so that I loose the focus on what I am trying to do. A similar thing happens to me when I am listening to music or trying to meditate.
I end up thinking about what we should be having for supper or how I am going to solve the problems of the world and before I know it a selvedge has pulled in, the beat has gone to the dogs and something horrible has happened to a thread at the back of the loom.
On my last project (Differential Shrinkage Scarf) where concentration on the technique was so important ( beating 10 ppi with a 20/2 weft needs nerves of steel) I wrote myself a little list and pinned it to the loom and read it out loud to myself as I wove. I consider myself to be an occasional weaver so I probably don't have the fully developed muscle memory that is needed to get all the little complex movements just right. It is early days yet but I think that this little weaving chant and check list might help.
I would be interested to hear if other people have a "focus" problem and how they resolve it.
I end up thinking about what we should be having for supper or how I am going to solve the problems of the world and before I know it a selvedge has pulled in, the beat has gone to the dogs and something horrible has happened to a thread at the back of the loom.
On my last project (Differential Shrinkage Scarf) where concentration on the technique was so important ( beating 10 ppi with a 20/2 weft needs nerves of steel) I wrote myself a little list and pinned it to the loom and read it out loud to myself as I wove. I consider myself to be an occasional weaver so I probably don't have the fully developed muscle memory that is needed to get all the little complex movements just right. It is early days yet but I think that this little weaving chant and check list might help.
I would be interested to hear if other people have a "focus" problem and how they resolve it.
Tuesday, December 31, 2013
Differential Shrinkage Scarf - Postscript #2
I have finished the sample that I wrote about in my previous post and it has worked out very well. The combination of an open sett and a more restrained fulling process has produced the the effect that I was hoping for. The secret of success for this look is to get the shrinkage with just enough felting to hold the scarf together but no more.
As I have said before this was a lovely project to work on and I have learned enough to enable me to produce similar scarves in the future.
So, what's next?
As I have said before this was a lovely project to work on and I have learned enough to enable me to produce similar scarves in the future.
So, what's next?
| Off the loom before fulling |
| After fulling |
| The model |
| Fulling Table |
Labels:
20/2 Mora,
Differential Shrinkage,
felting,
fulling,
plain weave
Sunday, December 29, 2013
Differential Shrinkage Scarf - Postscript #1
I have a little bit of warp left for the differential scarf so I have re-sleyed to 10 epi and shall weave a sample at 10ppi. I shall full very lightly so as to just shrink the merino a little bit; I want to try for something light and lacy.
I have just done a little bit and it is not easy. Weaving with such an open sett means that the slightest nudge will displace a weft thread; I am having to be very careful and gentle and have to confess that I am finding it a bit of a challenge.

This has been an interesting project which took a little longer that I planned but which was nethertheless very satisfying and great fun.
Now that the project is nearly over I have written up all my notes and calculations. I keep a manual notebook but I also find using a spreadsheet invaluable - here are some of the tables that I use;
I have just done a little bit and it is not easy. Weaving with such an open sett means that the slightest nudge will displace a weft thread; I am having to be very careful and gentle and have to confess that I am finding it a bit of a challenge.
This has been an interesting project which took a little longer that I planned but which was nethertheless very satisfying and great fun.
Now that the project is nearly over I have written up all my notes and calculations. I keep a manual notebook but I also find using a spreadsheet invaluable - here are some of the tables that I use;
Saturday, December 28, 2013
Stephanie's Scarf
The differential shrinkage scarf is finished and here is Stephanie wearing it! It was touch and go to get it finished and I actually had to take the scarf back after I had given it to her so that I could trim a few loose threads.

It is unlikely that it will be worn for a few months. It is quite hot here in Australia at the moment.
These pictures show how the fabric turned out after fulling.
And here I am trying to be all arty!

It is unlikely that it will be worn for a few months. It is quite hot here in Australia at the moment.
These pictures show how the fabric turned out after fulling.
And here I am trying to be all arty!
Saturday, December 21, 2013
Differential Shrinkage Scarf - Fulling the sample
I have been having fun today felting the sample. We are having a little heatwave at the moment so it was very hot in the laundry whilst I was doing all this.
| Sample as woven |
This is the sample before I started the fulling process. It is 18" long and 16.7" wide. I twisted the fringe at one end and just left the other hem.
I used a washing up bowl to do the fulling and I borrowed my wife's milk thermometer to assist in temperature control.
The technique that I used was 5 minutes gentle agitation in hot water followed by 5 minutes agitation in cold water (from the cold tap which is 60F today).
This is the degree of fulling after three hot/cold cycles with hot at 120 F.
There is a nice bit of movement. The sample length has reduced to 14" (22% shrinkage) and the width has shrunk to 13" which is about the same percentage.
| Second fulling |
| Second fulling |
| Felting |
Here one can see how much the merino has felted. Again, I think that this is a little bit too much. So, I shall repeat the process to get myself to stage one and then do little increments of temperature to get to the ideal 25%
This is all very exciting. It is too warm to do any more messing around with hot water so I shall wait until tomorrow to start on the scarf. Time for a nice cup of tea and a bit of gentle fringe twisting
Thursday, December 19, 2013
Subscribe to:
Posts (Atom)